Python
flask
html作为参数传递
https://www.jianshu.com/p/2e51efd19bf1
loguru
ftp
from ftplib import FTP

class FtpClient:
    def __init__(self,host,userName,userPwd) -> None:
        self.client = FTP()
        self.client.connect(host,21)
        self.client.login(userName,userPwd)

    def upload_file(self,localFilePath,serverFilePath):
        fp = open(localFilePath, "rb")
        self.client.storbinary(f'STOR {serverFilePath}',fp,8192)

    def download_file(self,serverFilePath,localFilePath):
        fp = open(localFilePath, "wb")
        self.client.retrbinary(f'RETR {serverFilePath}',fp.write,8192)

    def close(self):
        self.client.close()
下载FTP可以使用还可以使用wget包下载(wget需单独下载)
from wget import download
download('ftp://userName:[email protected]/file/a.zip','./')
mitmproxy
运行python脚本
demo.py内容
import mitmproxy.http
from mitmproxy import ctx

def request(flow: mitmproxy.http.HTTPFlow):
    if 'xxxxxxxxxxxxxxx' in flow.request.url:
        flow.request.url = 'http://www.ooofeng.cn/ctp/ctp.html'

def response(flow: mitmproxy.http.HTTPFlow):
    if 'user_agent' in flow.response.text:
        flow.response.text = '123'
官方文档
https://docs.mitmproxy.org/stable/
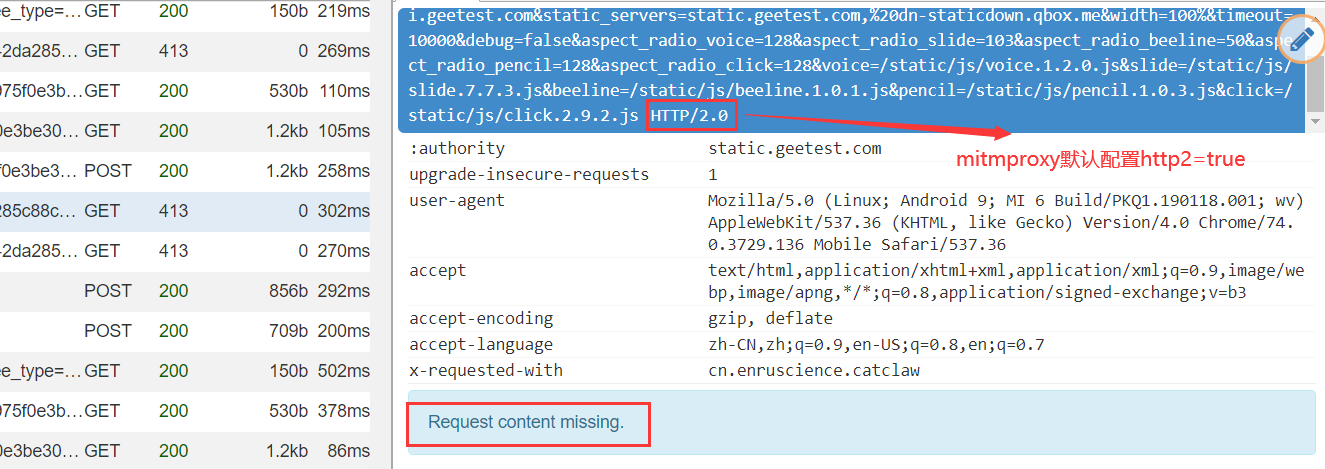
问题
mitmproxy请求内容缺失(Request content missing)返回413状态码
将mitmproxy配置中的http2改为false即可
pandas
从sqlite3数据库读取\写入数据
读取数据
转换数据到字典
orient的几种参数类型:
orient : str {'dict', 'list', 'series', 'split', 'records', 'index'}
    Determines the type of the values of the dictionary.

    - 'dict' (default) : dict like {column -> {index -> value}}
    - 'list' : dict like {column -> [values]}
    - 'series' : dict like {column -> Series(values)}
    - 'split' : dict like
      {'index' -> [index], 'columns' -> [columns], 'data' -> [values]}
    - 'records' : list like
      [{column -> value}, ... , {column -> value}]
    - 'index' : dict like {index -> {column -> value}}
文件操作
创建多级文件夹,
获取某文件夹下最新文件
from re import match
from os import scandir

def get_newest_file(src='.',matchRegex='^.*$'):
    files = [i for i in scandir(src) if i.is_file() and match(matchRegex, i.name)]
    files.sort(key=lambda x: x.stat().st_mtime,reverse=True)
    return files[0].path if len(files) > 0 else None
from os import scandir,path
def get_newest_file(src='.'):
    return path.abspath(max(scandir(src),key=path.getctime))
重载包
获取MAC地址
from os import popen
from re import findall

def get_mac():
    text = popen('getmac /v').read()
    data = findall('WLAN.*?([\dA-Z-]{17})',text)[0]
    return '.'.join(findall('(.{4})',data.replace('-','')))
from uuid import UUID, getnode

def get_mac_address():
    mac = UUID(int=getnode()).hex[-12:]
    mac_str = ".".join([mac[e:e + 4] for e in range(0, 11, 4)])
    print(mac_str)
    return mac_str

get_mac_address()
FTP上传, 下载
from ftplib import FTP

class FtpClient:
    def __init__(self,host,userName,userPwd) -> None:
        self.client = FTP()
        self.client.connect(host,21)
        self.client.login(userName,userPwd)

    def upload_file(self,localFilePath,serverFilePath):
        fp = open(localFilePath, "rb")
        self.client.storbinary(f'STOR {serverFilePath}',fp,8192)

    def download_file(self,serverFilePath,localFilePath):
        fp = open(localFilePath, "wb")
        self.client.retrbinary(f'RETR {serverFilePath}',fp.write,8192)

    def close(self):
        self.client.close()
获取当前文件的位置、所在文件夹的位置
获取文件所在路径
获取当前文件所在文件夹绝对路径
from sys import argv
from os.path import dirname, realpath

print(dirname(realpath(argv[0])))
# E:\code\demo
print(dirname(argv[0]))
# e:\code\demo
切换工作目录到当前文件所在路径
from sys import argv
from os import chdir
from os.path import dirname, realpath

chdir(dirname(realpath(argv[0])))
一行代码启动http服务器
普通启用
启动cgi的http服务器
解压缩文件
解压
压缩
from zipfile import ZipFile

def compress_zip(fileList):
    with ZipFile(f'xxxx.zip','w') as obj:
        for i in fileList:
            obj.write(i)
    print('压缩成功...')
修改注册表
修改环境变量
import win32api
import win32con

key1 = win32api.RegOpenKey(win32con.HKEY_CURRENT_USER,r'Environment',0,win32con.KEY_ALL_ACCESS)
oldPath = win32api.RegQueryValueEx(key1,'Path')[0]
print(oldPath)

newPath = oldPath.strip(';')+r';E:\code\demo'
win32api.RegSetValueEx(key1,'Path',0,win32con.REG_EXPAND_SZ,newPath)
key1.close()
python pymysql以字典格式查询
from pymysql import connect,cursors

conn = connect(**my.mysqlConig)
cursor = conn.cursor(cursor=cursors.DictCursor)
python 路径
路径拼接
获取绝对路径
获取当前文件、文件夹的目录路径
获取真实路径
获取桌面等特殊文件夹
from win32com.shell import shell,shellcon

def get_desktop_path() -> str:
    return (shell.SHGetPathFromIDList(shell.SHGetSpecialFolderLocation(0,shellcon.CSIDL_DESKTOP))).decode('gbk')
获取摄像头照片
import cv2
from datetime import datetime
from time import sleep

def snapShotCt(camera_idx = 1):
    cap = cv2.VideoCapture(camera_idx)
    ret, frame = cap.read()
    cv2.imwrite(f"capture{datetime.now().strftime('%H%M%S')}.jpg", frame)
    cap.release()
# snapShotCt(0)
while True:
    try:
        snapShotCt(0)
    except:
        pass
    sleep(3)
xpath转换为字符串
from lxml.html import tostring
from lxml import etree

def node_html(xpath_node):
    # return tostring(xpath_node, encoding='utf-8').decode('utf-8')
    return etree.tostring(xpath_node,encoding='utf-8',pretty_print=True).decode('utf-8')
获取本月最后一天
调用calendar包获取本月的范围
from calendar import monthrange
from datetime import datetime
now = datetime.now()
thisMonthLastDay = now.replace(day=monthrange(now.year,now.month)[1])
from datetime import datetime, timedelta
def get_month_end() -> datetime:
    now = datetime.now()
    extrayear, month = divmod(now.month, 12)
    return datetime(now.year+extrayear,month+1,1) - timedelta(days=1)
from datetime import datetime, timedelta
now = datetime.now()
thisMonthLastDay = (now.replace(day=1)+timedelta(days=31)).replace(day=1)-timedelta(days=1)
from datetime import datetime, timedelta
now = datetime.now()
thisMonthLastDay = now.replace(day=1).replace(month=now.month+1)-timedelta(1)
thisMonthLastDay = datetime(now.year,now.month+1,1)  - timedelta(1)
python log日志记录
参数:
format 日志格式
# 超过200M就新生成一个文件 logger.add("size.log", rotation="200 MB") # 每天中午12点生成一个新文件 logger.add("time.log", rotation="12:00") # 一周生成一个新文件 logger.add("size.log", rotation="1 week")
日志保留30天
logger.add("file.log", retention="30 days")
#压缩日志文件
logger.add("file.log", compression="zip")
重载
数据挖掘常用工具包(python和r)
来源
http://code.py40.com/3177.html
正则表达式
用正则表达式进行文字局部替换
>>> import re
>>> a = 'abc123bcd456'
>>> re.sub('[a-z]+(\d+)[a-z]+(\d+)','num1:\\1 num2:\\2',a)
'num1:123 num2:456'
注意: 使用
\\1表示替换原正则表达式的第一个括号的匹配内容, 不要使用\1
当然, 如果使用raw模式, 那么\1就是可以的
或者使用下面这种使用lambda表达式的做法, 但是貌似好像写法并没有第一种简洁
来源: https://www.cnblogs.com/heyang78/p/8949864.html
.groupdict()的用法
In [22]: re.search('(?P<name>\w+),(?P<age>\d+)',a).groupdict()
Out[22]: {'name': 'orange', 'age': '18'}
在pattern里面可以指定匹配的字段, 并将字段对应一个键, 例如 (?P<name>\w+) 中name表示键, \w+匹配到的结果作为对应的值, 在一些场合, groupdict的用法还是非常常用, 而且有意义的
sub用法
re.sub用于替换字符串中的匹配项
参数:
其中pattern是我们的正则表达式, repl是替换的字符串, ==也可以是一个函数==, 这是有一个细节, 就是可以是一个函数, 所以具体怎么用呢, 往下看
先写一个普通的用法, 将字符串a中的数字全部替换为哈哈哈
这是普通的用法
如何使用函数呢?, 先定义一个函数, 将a里面的年龄数字全部加1
In [69]: a
Out[69]: 'orange,18-cookie,16-gogo,20'

In [70]: re.sub('(\d+)',age_add_one,a)
Out[70]: 'orange,19-cookie,17-gogo,21'
可以看出, 里面的数字全部加了1
那么, 还有没有更简便的应用函数的用法呢, 当然有, 那就是lambda表达式, 同样是年龄加1, lambda的做法是
match、search和findall的区别
re.search 扫描整个字符串并返回==第一个成功的匹配==
In [4]: re.search('(\w+),(\d+)',a).group()
Out[4]: 'orange,18'

In [5]: re.search('(\w+),(\d+)',a).group(1)
Out[5]: 'orange'

In [6]: re.search('(\w+),(\d+)',a).group(2)
Out[6]: '18'

In [7]: re.search('(\w+),(\d+)',a).group(3)
---------------------------------------------------------------------------
IndexError                                Traceback (most recent call last)
<ipython-input-7-43b557f97c35> in <module>
----> 1 re.search('(\w+),(\d+)',a).group(3)

IndexError: no such group
可以通过.group()方法匹配到获取到的元素, 使用.group(n)获取到匹配到的第n个元素, 因此re.search只匹配到了orange,18这组元素,匹配到第一组之后, 就不再进行匹配, 因此 cookie,16和gogo,20都没有匹配到
同时, .span()可以获得匹配到结果在原字符串中的位置下标, .span(n)表示匹配到的第n个元素在原字符串a中的位置, 如果不输入n, 或者n = 0, 则输出的结果是整个pattern匹配的结果, 以元组格式返回, 如下:
In [8]: re.search('(\w+),(\d+)',a).span(0)
Out[8]: (0, 9)

In [9]: re.search('(\w+),(\d+)',a).span(1)
Out[9]: (0, 6)

In [10]: re.search('(\w+),(\d+)',a).span(2)
Out[10]: (7, 9)

In [11]: re.search('(\w+),(\d+)',a).span()
Out[11]: (0, 9)
.groups()的用法: 可以返回匹配到字串的结果的元组, 示例如下
In [24]: re.search('(\w+),(\d+)',a).groups()
Out[24]: ('orange', '18')

In [27]: re.search('(\w+),(\d+)',a).groups()[1]
Out[27]: '18'
.regs: 返回整串和字串所在位置的二维元组, 第一个元素是整串的位置元组, 之后的是字串的元组, 数量的个数取决于()的数量, 注意, .regs这不是一个函数
.start()和.end()分表表示匹配到结果所在原字符串所在的初始位置和结束位置, 这个相对来说比较好理解一些
In [33]: re.search('(\w+),(\d+)',a).start()
Out[33]: 0

In [34]: re.search('(\w+),(\d+)',a).end()
Out[34]: 9
.string: 返回的是原字符串, 实际上好像也不会怎么用得到,
.pos表示匹配到字符串的起始位置
.re返回原匹配模式pattern
In [37]: re.search('(\w+),(\d+)',a).string
Out[37]: 'orange,18-cookie,16-gogo,20'

In [40]: re.search('(\w+),(\d+)',a).pos
Out[40]: 0

In [42]: re.search('(\w+),(\d+)',a).re
Out[42]: re.compile(r'(\w+),(\d+)', re.UNICODE)
还有'end', 'endpos', 'expand', 'group', 'groupdict', 'groups', 'lastgroup', 'lastindex', 'pos', 're', 'regs', 'span', 'start', 'string'等其他的用法, 暂时就不深究了, 以上一些方法已经非常实用了
如果未匹配到结果, 则结果返回None, 注意我在下面的匹配表达式中加了一个-, 所以是匹配不到结果的
re.match 尝试从字符串的起始位置匹配一个模式,如果不是起始位置匹配成功的话,match()就返回none
依旧是使用上面的a变量
In [53]: re.match('(?P<name>\w+),(?P<age>\d+)',a).groupdict()
Out[53]: {'name': 'orange', 'age': '18'}

In [54]: re.match('(\w+),(\d+)',a).groups()
Out[54]: ('orange', '18')
这是匹配正确的情况, 因为这个是从开头开始匹配的, 试一下不正确的, 并和.search()方法进行比对一下
In [55]: re.match('(cookie),(\d+)',a)

In [56]: re.match('(cookie),(\d+)',a) == None
Out[56]: True

In [57]: re.search('(cookie),(\d+)',a)
Out[57]: <re.Match object; span=(10, 19), match='cookie,16'>
(cookie),(\d+)这个模式在原字符串之中是存在的, 但是因为.match()方法是从开头匹配, 所以出现匹配不到的这种现象
re.findall在字符串中找到正则表达式所匹配的所有子串,并返回一个列表,如果没有找到匹配的,则返回空列表
.findall()是我在写爬虫中用到最多的方法. 因为爬虫经常会需要获得一个网页的很多甚至所有信息, 而.match()和search()方法最多匹配到一次就结束了, 所以用的比较少
In [58]: re.findall('(cookie),(\d+)',a)
Out[58]: [('cookie', '16')]

In [59]: re.findall('(\w+),(\d+)',a)
Out[59]: [('orange', '18'), ('cookie', '16'), ('gogo', '20')]

In [60]: re.findall('(\w+)-,(\d+)',a)
Out[60]: []
注意, .findall()方法至始至终返回的结果类型都是一个列表, 没有匹配到就是一个空列表, 匹配到就是类似于二维数组形式的列表, 不过此列表里面的元素是==元组格式==
上面这些是含有两个子串的结果, 能够匹配到返回的类似于二维数组的结果, 那么如果没有子串或者只有一个字串呢, 结果又是啥呢
In [62]: re.findall('\w+,\d+',a)
Out[62]: ['orange,18', 'cookie,16', 'gogo,20']

In [63]: re.findall('(\w+,\d+)',a)
Out[63]: ['orange,18', 'cookie,16', 'gogo,20']
通过上面的代码可以看到, 如果==没有字串或者只有一个字串==, 那么有匹配到结果, 会返回一个普通的一维列表, 所以返回的结果取决于你匹配模式字符串的字串的数量
==?P==的用法
有这样的字符串c, 我想直接匹配出下面的数据
但是字符串c前面又有xxxx的干扰
这里虽然有(?!xxxx:), 也加了括号, 但是由于?P!的加持, 导致匹配的时候, 不保留这个子串
更多详情:
https://mp.weixin.qq.com/s/hn0fbh3v-P-JTiPEmG6-Bg
pyecharts修改js默认加载地址
修改pyecharts中配置文件的默认加载地址
路径:
C:\Users\orange\Anaconda3\Lib\site-packages\pyecharts\globals.py
大概在125行左右, 有如下代码:
class _OnlineHost:
    DEFAULT_HOST = "https://assets.pyecharts.org/assets/"
    NOTEBOOK_HOST = "http://localhost:8888/nbextensions/assets/"
将DEFAULT_HOST修改为最新的加载速度快的地址, 如下:
class _OnlineHost:
    DEFAULT_HOST = "https://cdn.jsdelivr.net/npm/echarts@latest/dist/"
    NOTEBOOK_HOST = "http://localhost:8888/nbextensions/assets/"
海象运算符的使用
假如我们在一个函数里面需要调用一个全局的变量 num , 每运行一次函数, num都要加1,通常这种情况用来作为计数, 没有海象运算符, 我们该怎么用
In [1]: num = 0
   ...:
   ...: def test():
   ...:     global num
   ...:     num += 1
   ...:     print(num)
   ...:
   ...: for i in range(5):
   ...:     test()
   ...:
1
2
3
4
5
In [2]: num = 0
   ...:
   ...: def test():
   ...:     global num
   ...:     print(num := num + 1)
   ...:
   ...: for i in range(5):
   ...:     test()
   ...:
1
2
3
4
5
In [4]: result = 0
   ...: num = 0
   ...: while num <= 100:
   ...:     result += num
   ...:     num += 1
   ...: print(result)
5050
海象运算符的做法
In [3]: result = 0
   ...: num = 0
   ...: while (num := num +1) <= 100:
   ...:     result += num
   ...: print(result)
5050
或者
In [6]: result = 0
   ...: num = 0
   ...: while num <= 99:
   ...:     result += (num := num +1)
   ...: print(result)
5050
有时候在字典推导式的时候, 在没有海象运算符之前, 可能需要写很多代码, 但是有了海象运算符之后, 可能就需要一行代码就能搞定
比如, 有这样一段字符串:
普通的方法:或者这样:
又或是使用列表表达式去转换 这样当然是可以的, 因为[i.split(':') for i in text.strip().split()]刚好符合((1,2),(3,4),(6,5)) 这样n*2的列表的结构, 和zip类似, 但是比如如果text如下呢?(结果不要后面的1 2 3 4)
这样就不符合n*2的结构了, 所有上面的方法可能就不太适用了
但是可以下面这样做:
但是这样会引起一个冗余重复的问题, 因为i.split(':')被用了两次, 追求效率而且强迫症的我来说, 这肯定忍不了的
海象运算符, 可以解决这个问题
python获取环境变量
查看当前环境变量, 返回结果类似于一个字典格式, 因次可以通过os.environ['USERPROFILE'] 获取到当前用户的路径
environ{'ALLUSERSPROFILE': 'C:\\ProgramData',
        'APPDATA': 'C:\\Users\\orange\\AppData\\Roaming',
        'COMMONPROGRAMFILES': 'C:\\Program Files\\Common Files',
        'COMMONPROGRAMFILES(X86)': 'C:\\Program Files (x86)\\Common Files',
        'COMMONPROGRAMW6432': 'C:\\Program Files\\Common Files'
}
COMPUTERNAME: PC-ORANGE -> 当前电脑名称
USERPROFILE: C:\\Users\\orange -> 用户文件夹所在的路径
同时, os.path.expanduser('~') 也可以获取到当前的用户的路径, 对于像我这样不喜欢把文档, 下载, 桌面等文件夹放在桌面的人来说, 也就只有通过操作注册表获取到桌面的路径了
